Jarvis: The Mantis Workflow Builder
Welcome to Jarvis, the heart of automation and advanced workflow creation in Mantis. Jarvis is more than just a tool; it's your partner in building sophisticated, automated processes that can range from simple, everyday tasks to complex, multi-layered vertical applications. With Jarvis, you are the architect of intelligent systems.
This guide will walk you through the fundamentals of Jarvis, its powerful features, and how you can leverage it to bring your most ambitious ideas to life.
The Philosophy: High-Level Creation
Jarvis is designed for creators, thinkers, and builders. We handle the complex code so you can focus on the logic and strategy of your workflows. The core philosophy is to empower you to:
- Automate Everything: From data processing pipelines to customer support sequences, if you can map it out, Jarvis can automate it.
- Build Verticals: Construct complete, domain-specific applications using workflows as the backbone. Create solutions for finance, research, content creation, and more.
- Think at a Higher Level: Abstract away the low-level implementation details. Your focus should be on the "what" and "why" of your process, not the "how" of coding it.
The Jarvis Environment
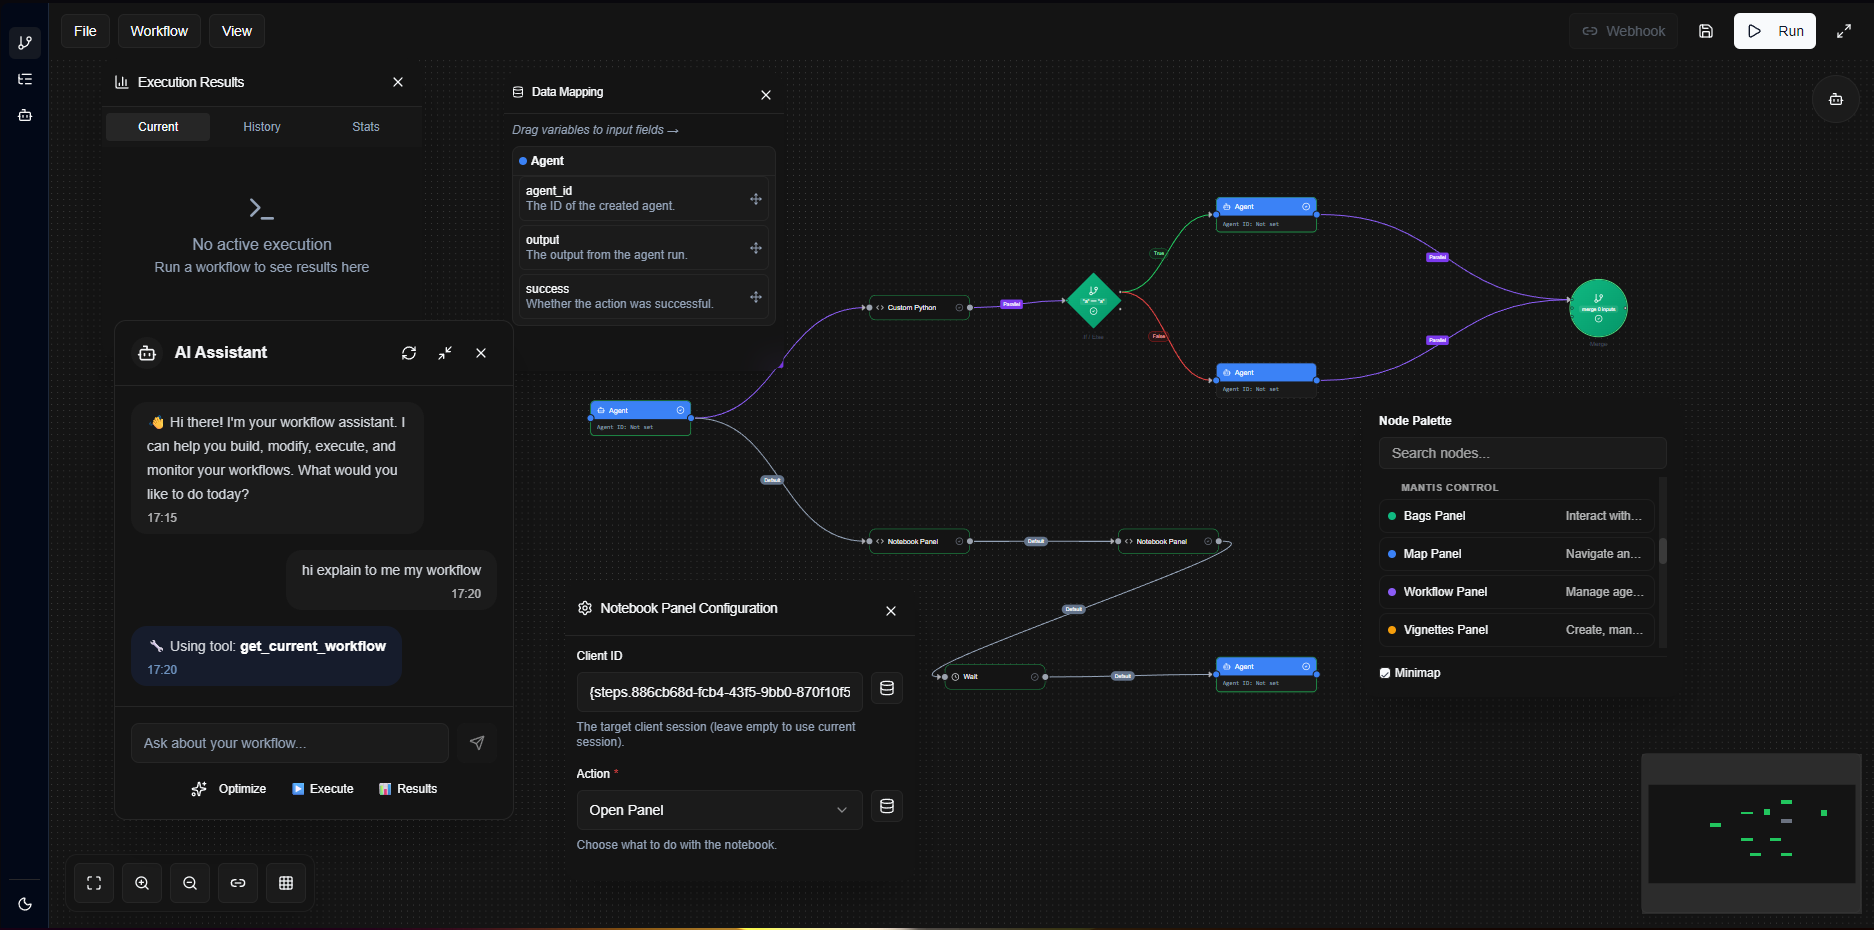
The Jarvis canvas is your playground. It’s an interactive, visual environment where your ideas take shape.
The interface is composed of three main parts:
- The Canvas: The large central area where you'll build and connect the components of your workflow. You can pan by clicking and dragging the background, and zoom with your mouse wheel.
- The Node Sidebar: On the left, you'll find your toolkit – a categorized and searchable library of nodes that represent actions, logic, and other workflows.
- The Header Menubar: At the top, you have controls to manage your workflows:
- New: Clears the canvas for a new workflow.
- Save: Saves the current workflow. Give your workflows descriptive names!
- Load: Opens a previously saved workflow from your list.
- Run: Executes the current workflow.
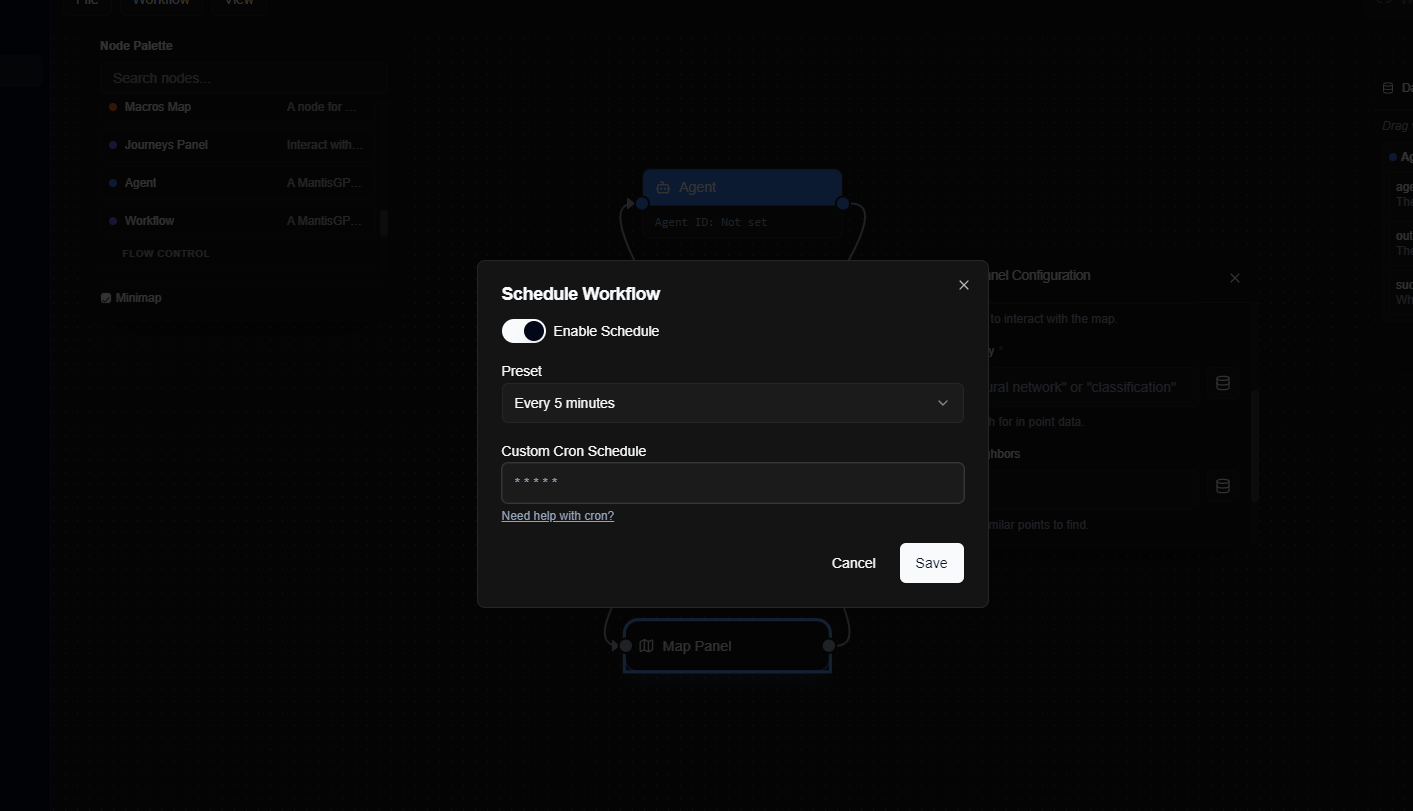
- Schedule: Opens the scheduling dialog to run the workflow at a specific time or interval.
Building Your First Workflow: A Detailed Walkthrough
Let's create a simple workflow to understand the basics. Our goal: use an AI agent to write a short paragraph about a given topic and see the result.
Add an Agent Node: From the Node Sidebar, find the "Agent Node" and drag it onto the canvas. This node is your connection to powerful AI models.
Configure the Agent Node: Double-click the Agent Node to open its configuration panel. You'll see several options:
- Node Name: Give it a clear name, like "Content Writer Agent".
- Agent Selection: Choose from a list of available AI agents. Each may have different strengths.
- Prompt: This is the crucial part. You'll tell the agent what to do. For this example, we'll write a prompt like:
Write a short paragraph about artificial intelligence and its impact on modern society.
Connect the Nodes (Data Flow): Now, we define the path of execution. You can connect multiple nodes together by clicking and dragging from one node's output handle to another node's input handle. An arrow, called an Edge, will appear, showing the direction of the flow.
Run Your Workflow: Once your nodes are connected, you can execute the workflow by clicking the "Run" button in the header menubar.

You've just built a dynamic workflow! When you run it, Jarvis will execute the agent with your specified prompt, and you'll see the agent's response as the output.
Core Concepts: Nodes and Edges
Nodes: The Building Blocks of Logic
Nodes are the functional units of your workflow. Each node is a self-contained step in the process with its own inputs, configuration, and outputs.
- Agent Node: The powerhouse of intelligence. Use this to incorporate AI agents for analysis, content generation, decision-making, and more. You can chain multiple agents together to create sophisticated AI pipelines.
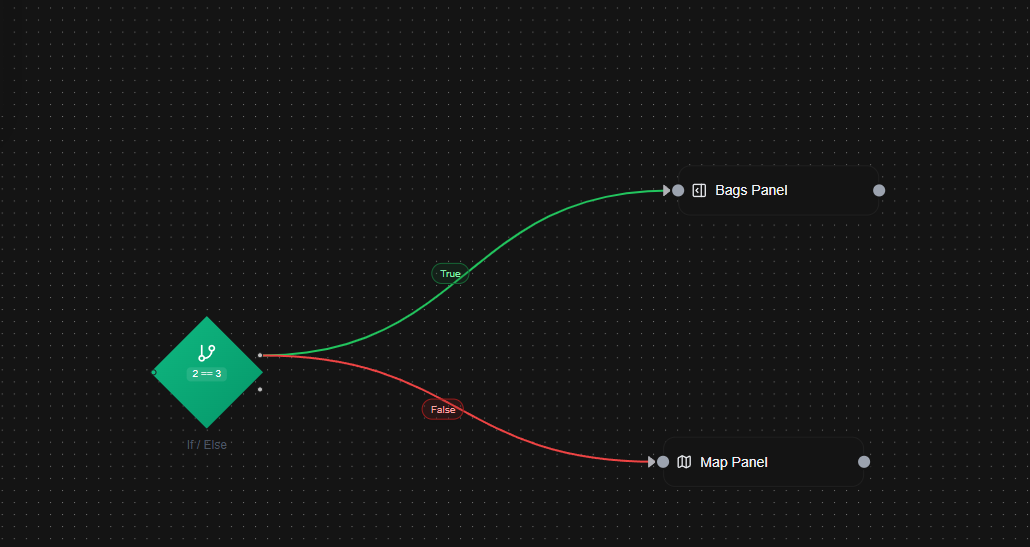
- Conditional (If/Else) Node: Introduce logic. This node evaluates a condition (e.g.,
{{AgentNode1.output}} contains "Error") and directs the workflow down different branches based on whether the condition is true or false. This is essential for creating robust, error-handling workflows. - Loop Node: For repetitive tasks. You can provide a list of items as input, and the node will execute a series of connected nodes for each item in the list. Perfect for processing batch data or running the same process on multiple targets.
- Workflow Node: This is where Jarvis truly shines for scalability. You can embed an entire workflow inside another. This allows you to create modular, reusable components. For example, you could have a complex "Customer Onboarding" workflow that you use as a single node in many other processes.
- Merge Node: This node allows you to bring multiple execution branches back into a single path. It's the counterpart to a Conditional Node or parallel execution paths.
- Registry Node: Access a library of pre-built, highly optimized functions and integrations. Think of these as specialized tools: sending emails, accessing databases, calling external APIs, performing complex data transformations, etc.
Edges: Defining the Flow
Edges are the connections that define the sequence of operations and the flow of data.
- Default Edge: A standard solid line that connects one node to the next.
- Parallel Edge: Some nodes can execute multiple downstream branches simultaneously. A Parallel Edge indicates that the workflow will not wait for one branch to finish before starting the next. This is a powerful feature for performance optimization.
- Edge Configuration: By clicking on an edge, you can open its configuration. You can give it a label for clarity and, for conditional edges, define the logic that determines if that path should be taken.
Advanced Functionality: Mastering Jarvis
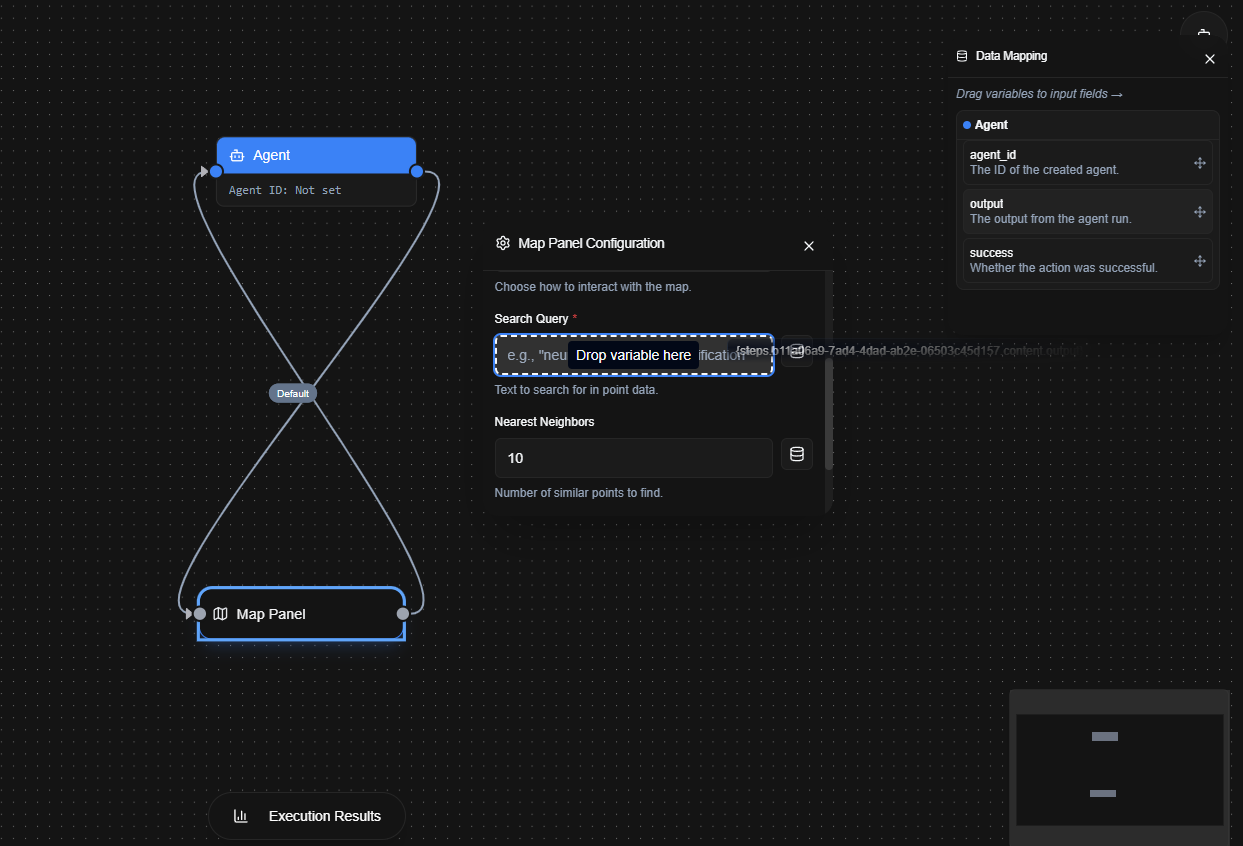
The Data Mapping Window
The true power of a workflow is in how data moves and transforms between steps. The Data Mapping window is your command center for this.
When you connect two nodes, Jarvis often makes an educated guess about how to map the data (e.g., mapping an agent's output to a logger's message). But for full control, open the Data Mapping window. Here you will see a visual representation of the source node's outputs and the target node's inputs. You can drag a line from any output to any input to create a custom mapping.
Scheduling and Triggers
Automation is most powerful when it's autonomous. The built-in scheduler lets you run your workflows automatically:
- Time-Based: Run at a specific time (e.g., every day at 5 PM).
- Interval-Based: Run every X minutes or hours.
- Event-Based (Triggers): You can configure workflows to run automatically when a specific event occurs, such as a new file being added to a folder or a webhook being called from an external service.
The Jarvis Assistant
You're not alone in building your workflows. The Jarvis Assistant is an AI-powered guide that can help you:
- Suggest Nodes: Based on your current workflow, it can suggest the most logical next step.
- Auto-Configure: It can help you configure complex nodes by asking you questions in plain English.
- Debug Logic: If your workflow has an error, the assistant can analyze the structure and the execution logs to help you find the problem.
- Generate from Prompt: Describe a workflow you want to build (e.g., "When I get a new email, summarize it and save the summary to a file"), and the assistant can generate a starter workflow for you.

Running and Debugging
Once your masterpiece is complete, it's time to bring it to life.
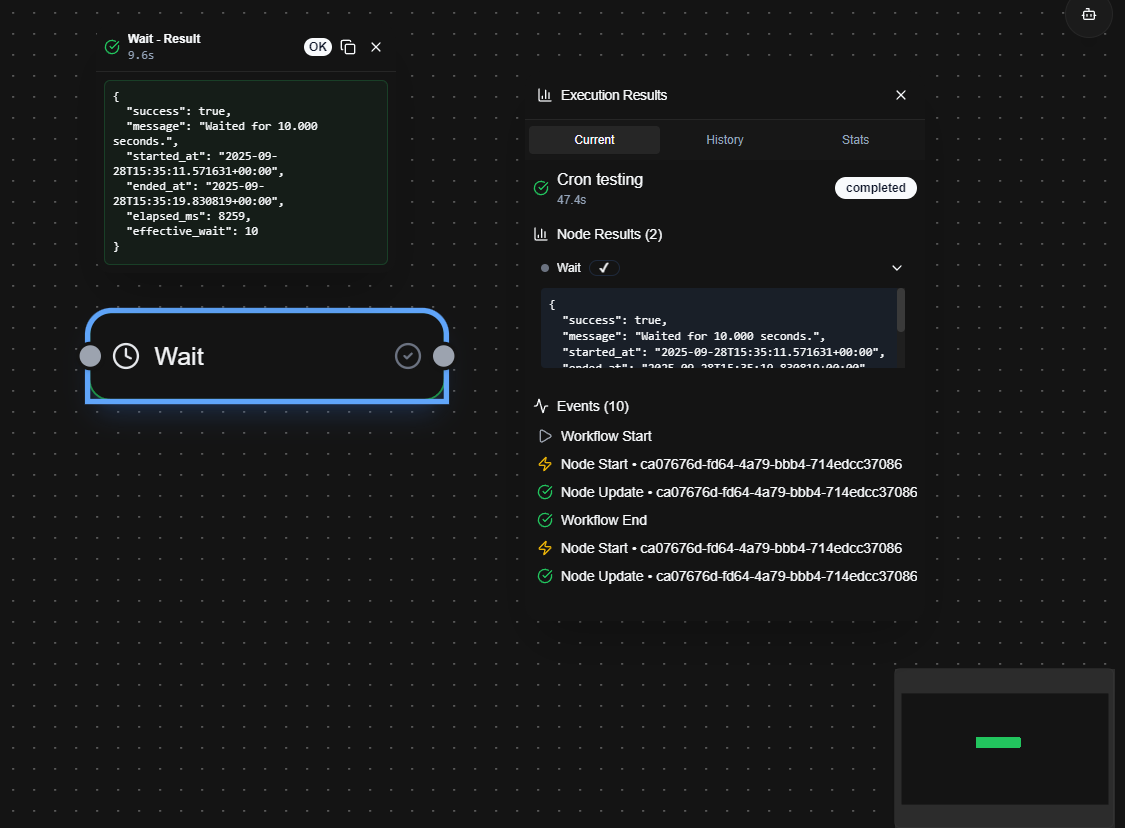
- Real-Time Execution: When you click "Run," Jarvis executes your workflow, highlighting each node as it becomes active. You can watch the flow of your logic in real-time.
- The Execution Results Window: After execution, this window provides a detailed log of the entire process. You can click on any node in the log to inspect its inputs and outputs at that point in time. If a node resulted in an error, the full error message will be displayed, making it easy to diagnose and fix the problem.
Best Practices for Workflow Design
- Modularity is Key: Break down large, complex problems into smaller, logical sub-workflows and then use the Workflow Node to combine them. A modular workflow is easier to understand, debug, and reuse.
- Name Everything: Give your nodes and edges descriptive names.
Get User Emailis much clearer thanAgent Node 1. - Handle Errors Gracefully: Use Conditional Nodes to check for potential errors and create branches to handle them. For example, if an API call fails, you can have a branch that retries or sends a notification.
- Comment Complex Logic: For particularly tricky parts of your workflow, you can add notes or use dedicated "Comment" nodes to explain your logic for your future self or for your teammates.
Jarvis is a platform for innovation. We are incredibly excited to see what you will build with it.